RapidPIV
RapidPIV: kHz PIV with Real-Time Display Using an Nvidia GPU
Scott A. Bollt, Samuel H. Foxman, and Morteza Gharib
Download
 RapidPIV 1.0, Windows x86_64
 RapidPIV 1.0, Linux x86_64 (glibc 2.35+)
User Guide
Prerequisites
- Nvidia GPU, Turing/Ampere/Ada generation (RTX 20xx/30xx/40xx)
- Blackwell (RTX 50xx) may work but is currently untested
- Latest Nvidia driver. We have only tested on new (>= version 550) Nvidia drivers.
- Linux: must have
libnvidia-opticalflow.solibrary. It is possible to have the Nvidia driver installed, but not have this library, depending how your distribution packages the Nvidia driver. On Ubuntu,sudo apt install nvidia-driver-550installs the optical flow library.
- Linux: must have
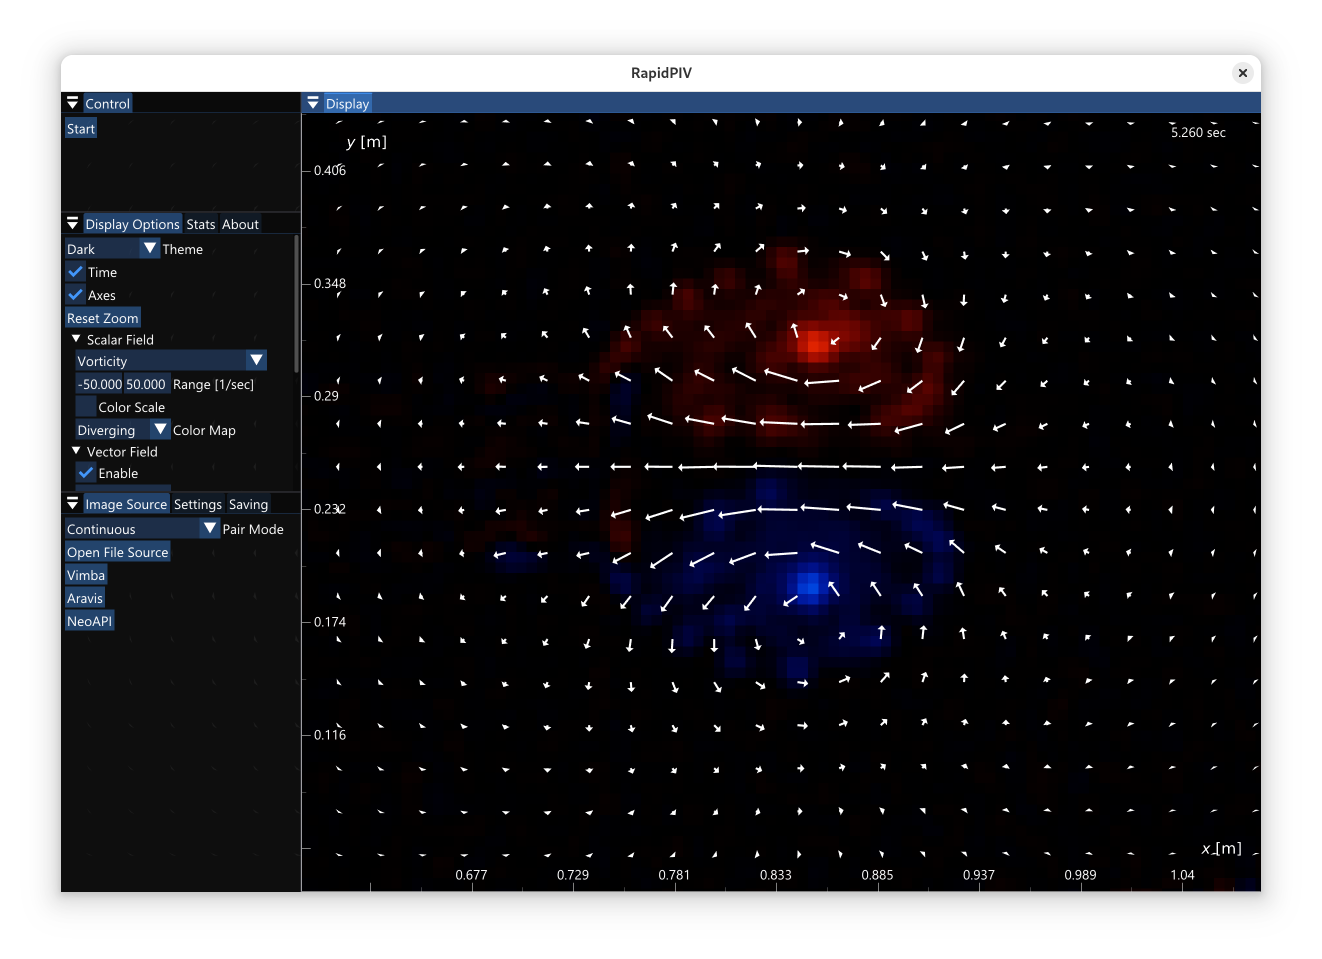
Select an Image Source
"Open File Source"
read image files (.png, .jpg, .tiff, etc) from a directory. Images are automatically sorted based on numbers found within the file names.
Stream from a GenICam camera
- Install the GenICam Transport Layer for your camera from the manufacturer's website. If you can open the manufacturer's camera viewer app and see images, it should be set up.
- Choose a GenICam backing library: Baumer's NeoAPI, Allied Vision's Vimba X, and open-source Aravis. All three libraries claim to support GenICam cameras, but we found that in practice, often only one of these libraries works for a particular camera and host machine.
- NeoAPI and Vimba seem to work with most cameras on Windows.
- Aravis works with most cameras on Linux.
Select processing options
Defaults options should work well; however, there are many settings available.
Save Results
Under the "Saving" tab, select the output folder where you want to save results. Under "Fields", choose whether to save images and/or vector fields. Once started, results will be saved to the output folder, with one .mat per frame.
Command Line Usage
RapidPIV can be run from the command line with the following options:
Optional Arguments
-h, --help: shows help message and exits-v, --version: prints version information and exits--nogui: Disable GUI--gpu: CUDA GPU index [nargs=0..1] [default: 0]--list-gpus: Print available CUDA GPUs and exit--output: Output directory to save flow vector .mat files--output-processed-vecs: Save processed vectors to output files--output-raw-vecs: Save raw vectors from the Nvidia Optical Flow Accelerator to output files--output-processed-images: Save preprocessed images to output files--output-raw-images: Save raw input images (without preprocessing) to output files--output-vorticity: Save vorticity of processed velocity fields to output files--output-no-compression: Disable .mat file zlib compression--json-stats: Print JSON statistics object to stdout at end of program
Input Source
--files: Input directory with image files, which is automatically sorted alphabetically and by number--files-loop: Repeat images files from beginning when finished--files-preload: Preload image files into CPU ram--files-offset: Skip first n frames--files-count: Stop after n frames--camera: Use camera as input source. Optionally specify camera index if there are multiple.--list-cameras: Print available cameras and exit
NVidia Optical Flow Accelerator (NVOFA) Settings
--block-size: NVidia Optical Flow Block Size [nargs=0..1] [default: 4]--pairs: Images come in A/B pairs, from a double-pulsed laser, as opposed to a continuous video stream.--pairs-offset: Offset A/B pairs by one frame
High Pass Filter
--high-pass: Enable high pass filter with gaussian kernel size in pixels.- 3x3: sigma=1.0
- 5x5: sigma=1.6
- 7x7: sigma=2.2
- 9x9: sigma=2.8
- 11x11: sigma=3.4
- 13x13: sigma=4.0
- 15x15: sigma=4.6
Contrast Limited Adaptive Histogram Equalization (CLAHE)
--clahe: Enable CLAHE--clahe-clip-limit: Limit amplificiation in areas with low contrast by redistributing probability density above a threshold [nargs=0..1] [default: 2]--clahe-grid-size: Divide input image into NxM rectangular tiles normalized separately before smoothing [nargs=0..2] [default: {8 8}]--disable-post-process: turn off postprocessing steps